
Required Materials:
▦ Pugly Pixel Marni-Inspired Gingham Patterns which you can download for FREE on Pugly Pixel here
▦ Photoshop - If you don`t have Photoshop you can down a 2 week free trial on the Adobe website here
▦ 8.5 x 11 inch white card stock - I prefer a matte finish cardstock
▦ A colour printer or you can take your files to a print shop to have them colour printed for you. I got mine printed at a local Staples Copy & Print Center
▦ Paper trimmer or a craft knift (or if all else fails you can use a good pair of scissors)
▦ Cutting mat, if you use a craft knife
▦ Ruler
▦ Pencil
Optional Materials (depending on what you decide to make with your printed patterns):
▦ Envelopes
▦ String or ribbon
▦ Hole punch
▦ Graph paper, lined paper or blank paper of any size you like
▦ Access to a printing shop - I had my little notebook made at the Staples Copy & Print Center
How to use Photoshop to make and print your Marni-inspired patterns on cardstock:
1. Download the Marni-inspired gingham patterns from Pugly Pixel, and save them to your computer or exernal hard drive. Read Katrina`s Terms Of Use before you use them! :)
2. Open your Photoshop program.
3. Visit this other Pugly Pixel tutorial that shows at the bottom how to load your pattern files into Photoshop. This tutorial is un-related to the Marni-inspired patterns but will explain how to load any type of pattern files into Photoshop.
4. Now we want to start a new document and fill it with the Marni-inspired pattern so we can print it. Go to the FILE menu again ---> then click NEW for a new document.
5. Photoshop will give you a pop up box and ask you what size you would like your new document to be. I printed my patterns on 8.5 x 11 white card stock so I wanted my Photoshop document to be the same size as my paper. You will see the width and height selection in the pop-up box and it may be in pixels or centimeters, etc. You want to change that using the drop down arrow to set it to inches. Then set the WIDTH: 8.5 inches and the HEIGHT: 11 inches. Make sure the background colour in the pop up box is set to white or transparent.
6. Once you have your 8.5 x 11 blank new document open in a new Photoshop window, you can go to the EDIT menu again ----> go to FILL ---> then select the Marni-Inspired gingham pattern you would like to use
7. Your new 8.5 x 11 document should now be filled with one of your Marni-inspired patterns. You can save your document and print it on your white cardstock with your colour printer. Or alternatively, you can save your file to a memory stick and take it to your local print shop to have them do the colour printing for you. I took mine to the Stapes Copy & Print Center and I had them make 4 copies of each of my patterns, so that way if I made a mistake I had a few extra.
NOTE: I`m no Photoshop pro. Far from it. I`m totally still a newbie at it. So when I printed my patterns onto the card stock they didn`t print right to the edges of the paper (there was a white border around the edge). Honestly, I don`t know how to fix that. If anyone knows how to fix that then please leave a comment and let me know. However, even though the patterns didn`t print right to the edges of the cardstock it didn`t matter because I was cutting the cardstock anyways, so I just cut off the white border and it all worked out perfectly.
Now that you have your Marni-inspired patterns printed on your white card stock you can go to town on making your stationery! For this part you will need your craft knife and cut mat and ruler (this is what I used), or paper trimmer. Also, please be careful when cutting your patterned paper! While I was making the note cards I cut one of my fingers. It was bad. Like lots-of-blood bad. Like I-contemplated-going-to-the-hospital- because-I-thought-I needed-stitches bad. Seriously. So, safety first!!!! Watch those fingers when using your craft knife or paper trimmer!

1. I had a bunch of blank, pre-made gift tags at home that I bought from Michaels a while back. I just traced one of the blank gift tags onto one sheet of the Marni-inspired patterns and then cut out the shape. Voila!!! Super easy! You can use any shape or size you want. Even just use your ruler to trace out a rectangle shape of any size you like, and then cut it out with your craft knife or paper trimmer. Or, if you have a paper punch that will punch gift tags then you can just use that. Even a round circle punch would make cute round gift tags.
2. Use your hole punch to punch a hole at the top and attach your string or ribbon so you can tie your gift tags onto presents for friends or family.
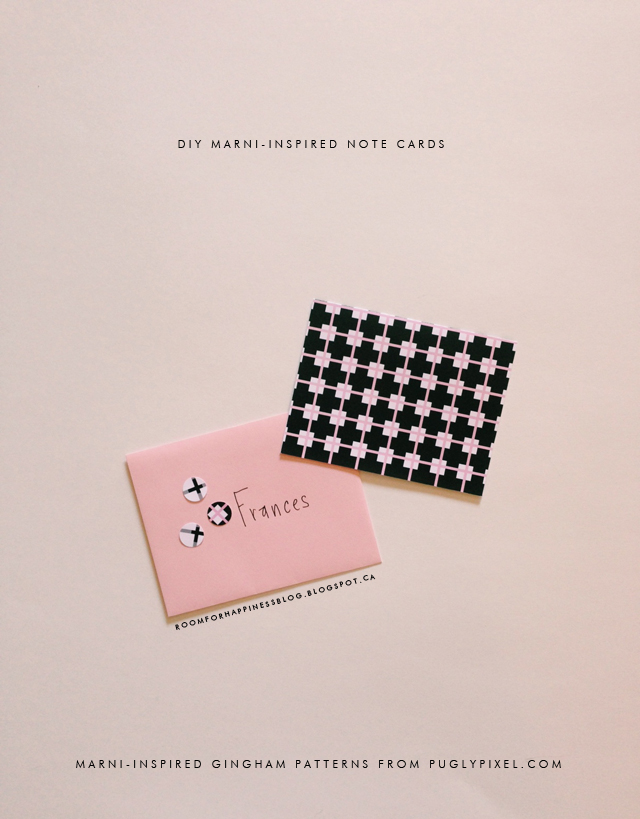 To Make The Marni-Inspired Notecards:
1. First, I found some envelopes in coordinating colours (I purchased mine at Staples). Even if you use white envelopes that`s fine, too! I chose the envelopes first so that I would know what size to cut my notecards. My envelopes were 4.5 x 5.75 inches.
2. Choose one of your Marni-inspired patterned sheets of cardstock, and use your ruler and pencil to trace out the size of your note card on the patterned paper. For my cards I traced out a rectangle shape that was 8.5 inches (height) x 5.5 inches (width). Then use your craft knife and ruler to cut out the rectangle shape.
3. Score and fold your notecard in half and that`s it!
4. Optional: Use your other patterned papers to make little embellishments for your envelopes! I used a small circle punch to punch some small paper circles from the cardstuck, then I glued them onto the front of the envelope. Also, you can use the circle embellishments as a seal for the back of the envelope, if you want.

1. Choose the Marni-inspired patterned cardstock you would like to use for the cover of your notebook. Use your pencil and ruler to draw a rectangle onto the paper that is about 8 inches (height) by 6 inches (width). You can make the cover any size you like, so that size is just a suggestion. I actually just used another notebook I had at home and I traced the shape onto my patterned cardstock. Then I used my craft knife and ruler to cut out the rectangle cover shape.
2. Take your cover and a package of graph paper or lined loose leaf paper to a local print shop. Ask them to make a spiral bound book using your Marni-inspired pattern cardstock as the cover. I chose black for the spiral binding but they may have other options at your print shop so you can ask what they have. I also asked them to cut the graph paper to the size of the cover, so this way I wouldn`t have to worry about cutting 150 sheets of paper. I also had them cut and add a white piece of cardstock to act as the back of the notebook.
3. The spiral binding I got at the Staples Copy & Print Center came with clear, plastic front and back covers to protect the notebook. This plastic protects the front and back cardstock covers from wear and tear. You can always omit the plastic covers, if you prefer, or ask for them if your copy center doesn`t include those with the spiral binding.

Hope you enjoyed this little DIY! Thanks to Katrina at Pugly Pixel for making the Marni-Inspired gingham patterns and for all the other wonderful resources on her blog! If you haven`t visited Pugly Pixel then I suggest you head over there and check it out (make sure you`ve got a few hours...you`ll need it!) ▲
I really like the notebook, and pugly pixel:) I am a semi photoshop pro, and I can answer your question about it not printing to the edge of the paper. That is called a bleed and you will never be able to do it at home all printers have a built in white space, no matter how much you try... When printing companies do a full flood print (what you call printing to the edges) it is usually done on a larger paper than has been cropped to the crop line. It has to be per-designed that way, for a full sheet of paper 8.5x11 the design would be 8.75x11.25 and cropped down.
ReplyDeleteYou did a great job!
Ahhh, I get it now - Thanks so much for explaining, Daphne! :) I was attempting to Google the answer to this but all the info seemed like it was in another language since I am still learning at Photoshop. :P Thanks for the lovely comment - I think the notebook was my fave of all, too!
DeleteGorgeous Sara! My home printer ( Canon Pixma) prints a bleed on A4 size paper. It's pretty handy! Maybe check your printer settings as modern home printers have this option for printing photo sizes
ReplyDeleteThanks so much, Rachel! :) The downside is that I don`t have a colour printer at home...Blogger fail for me! :P I am going to be buying a new colour printer soon though, so I`m hoping that it will make things easier for me when doing some blog projects. I read on your blog I think you mentioned your Canon Pixma too, and I was actually going to maybe ask you about it as it seems like it might be a good option for me. I might have to look into that one as a possibility, as I really would like a good, colour printer that`s going to last me a while.
DeleteOooh....these are fantastic, Sara! Those gift tags are adorable and I just love the way you styled these shots.
ReplyDeleteThanks, Amy! And thanks again for including me on your blog - I am so thrilled! :)
Delete